Gimli Peak and Ridge
I was looking at hikes in Valhalla Provincial Park, and Gimli Peak immediately caught my eye. The fourth highest peak in Valhalla Provincial Park, it is popular with climbers, and there is a Class 3 scramble up the east ridge. Although there is plenty of information about the climbs online, I didn't find much information about the scramble. I am happy to report that it is an incredibly rewarding hike/scramble, and the panoramic views at the top of Gimli Peak are definitely worth the grind. I think Gimli Ridge could be skipped in favour of Gimli Peak - the only thing you get from Gimli Ridge is a slightly different angle of more limited views, whereas Gimli Peak provides a beautiful 360° view. Both are nice though!
I had intended on doing Gimli Peak for sure, and I wanted to attempt Asgard (a nearby peak) if I had time, but I didn't realize that getting to Asgard would be so hard - there's a ridge on either side of Gimli and getting to Asgard would involve quite a bit of descent and then a climb back up from the valley. I'm not quite sure where a safe descent into the valley would even begin. I hope I can come back one day and summit more mountains in the area.
Date: Aug 2, 2020
Park: Valhalla Provincial Park
Name of Hike: Gimli Peak, Gimli Ridge
Mountain Range: Selkirk Mountains
Elevation: 2806m
Distance: 15.8km (according to Topo Maps+ app)
Elevation Gain: 1574m (according to Topo Maps+ app)
Total time (including lots of time lost): 10.5 hours
I think the entire hike should only take 9ish hours, and you can probably knock a kilometer off the distance and a little off the elevation gain and as well. I'll talk more about it below, but I tried to take shortcuts and they didn't work, and I ended up working much harder than I needed to. I'm also still quite a slow scrambler, and I'm sure most scramblers could do the final bit much quicker than I did.
The trail goes to the base of Gimli Peak and then you have a couple of options. You can go northwest to Gimli Ridge, or northeast to get to the east ridge of Gimli, where you can start the scramble up. I started by visiting Gimli Ridge, heading back to the base of Gimli, and then heading northeast to the ridge to summit Gimli Peak. Gimli Ridge is definitely much more popular than the summit - I only saw one other scrambler!


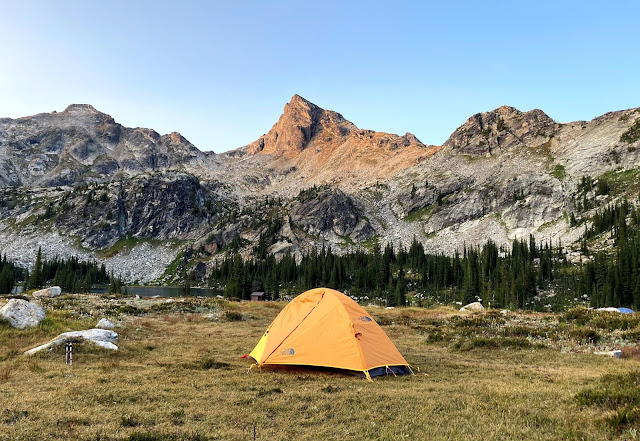
Above: Gimli Peak (first picture was taken around sunset, second picture was taken in the morning)
Below: Midgard Peak (left) and Asgard Peak (right) viewed from Gimli Peak

I have to apologize in advance: I got a new iPhone SE that I used to take a lot of these pictures, and while the pictures do look quite good, there's something I don't like about the iPhone photos - they seem a little oversaturated, as if I had edited them afterwards, but I swear it's just the default iPhone photo processing.
Also - this is my first time using an app to track my hike (GPS tracking, elevation/distance info etc), and I think I will definitely do this again. It's nice to be able to map out your route afterwards and see how you did.
Anyways, let's begin!
The trailhead is at (49.73571, -117.64476). The last 45ish minutes of driving is not super smooth. Fortunately there aren't any giant potholes - the main issues are the general roughness of the road and the countless cross ditches. If your vehicle has decent clearance (I drive a compact crossover), you shouldn't have too many issues - just slow down for the ditches so you don't scrape the bottom of your vehicle. As of the time I am writing this, Google Maps only sees the road up to (49.711109, -117.631961). Here's a picture of the road at that point. You can see a little blue "Valhalla Provincial Park" sign.

The drive from this point to the trailhead takes about 30-40min. As mentioned before, it is not smooth at all. Here's a little waterfall around 10 minutes from the trailhead:

I got to the trailhead around 8:10am. I was surprised because I had heard there was a big porcupine problem in the area, and that it was recommended that visitors wrap their vehicles in chicken wire so that porcupines can't eat their tires/brake lines, but I only saw a couple of vehicles that heeded this advice. I had brought a new roll of chicken wire, but after seeing so many cars unprotected I decided to not wrap my car. I faintly recall reading that porcupines are nocturnal - maybe wrapping isn't that important unless you're staying overnight? Anyways, after parking. getting all packed and applying sunblock and bug spray, I started hiking at 8:30am. Here is the trailhead:

The trail is well-trodden and easy to follow. It's pretty green, and there are plenty of wildflowers. There are also one or two downed trees, but it is still an easy trail.

There's a small bridge you have to cross to get across the stream (the picture below was taken around 10 minutes after starting).

The trail continues through a forested area for a while. Eventually, the trail loses the wildflowers and becomes more rocky and uphill, and you can see more of the surrounding mountains. The uphill isn't that strenous fortunately. All three photos below were taken around 9:30am (plus or minus five minutes). It is pretty nice to get a view of Gimli Peak only an hour in! The mountain in the third picture is Mount Presley (according to Google Maps).


Eventually, I made it out of the trees and got a closer view of Gimli, as well as a nice panoramic view of the mountains to the south. Here are a couple of pictures taken around 9:45am:

I met a few people that were headed back around this time, and they said they were hikers that were coming back from Gimli Ridge. I didn't really intend on checking it out, but I figured I might as well. I went northwest hugging the mountain, and it wasn't too bad, but on the way back I discovered there is a well travelled trail that doesn't involve as steep of a downhill - I would recommend going for that trail for a ever so slightly easier hike. Pictured below is my downhill section (which can be avoided by choosing the other trail) and then another view of the trail (taken 5 minutes apart, around 10:30am).


Then, the boulder crossing begins! I saw multiple paths going through this area, I think as long as you try to loosely follow one you will get to your destination - just aim for the ridge between Nisleheim Peak and Gimli Peak.
Both pictures below were taken around 10:45am.


I got to the ridge at around 10:50am (~2.5hr from the trailhead). I was hoping I could get further around the mountain or that there would be a route to Midgard/Asgard Peak but the drop from the ridge is pretty steep, and it doesn't seem like you can start the trek from here. I took a few pictures here and also took a video instead of a panorama, check it out! Below, you can see Mulvey Lakes and Gladsheim Peak (the highest peak in the Valhallas).

I stopped at the ridge to have my lunch and headed back at 11:15am. This time I opted for a path that hugged the mountain a little less (easier to see if you look at the GPS data). You can see the little camping area in the second picture.


I was back at the base of the mountain (near where the climbers begin their journey) around noon. This is where a bit of a nightmare began. I kept trying to take shortcuts to get to the east ridge because I didn't want to have to gain and lose that much elevation, but it didn't work. Every time, I would hike or scramble up, find a cliff, and head back down. You can see my scraggling downward path below. I have added arrows to indicate which direction I was heading when I travelled along each path:

If you want to go up Gimli, I would focus on going straight down to the white star I have marked on the above image. Don't take my weird route - you will save a lot of time. Do be careful because there may be scree on some downward routes. Beyond the white star, you will see that I took a different path going up and down. The rightmost path, the one that I took going up, is the main one, and the one I would recommend taking. There are plenty of cairns to follow, and the path is clearly well-trodden.
After quite a bit of hiking I was able to make it back up and regain the lost elevation. Here is a picture from around 1:30pm:

Things got a little not-so-fun here. The scree was pretty loose, and I took a small falling rock to the knee, which definitely hurt. There was some hands and feet scrambling at this point. I met a woman who was taking a break and I asked her about how her scramble up had been. She said she had done the scramble four years ago but this time she got lost really close to the top and couldn't find any more cairns. She said the path looked unrecognizable from how it looked the last time she had been there, and that she did not make it to the top. I was a little concerned hearing this, but I trudged onwards. The two pictures below were taken around 2pm. In the first picture, I went up the mound of rock on the left.

Not even ten minutes later, I came across this little spot where I could see the mountains to the north, Mulvey Lakes, as well as the mountains to the south. I put down my backpack here and put my phone in my camera bag and trudged upwards. From here on, it is pure scrambling, so I think this would be a good spot to put a heavy backpack down. My only regret was not taking a big swig of water before going up, because I was really parched before I even got to the top.


Now, for the scramble up: It isn't too bad, but there are exposed bits. It is a switchback-y scramble up the mountain. I find that when I'm scrambling with someone else (or see others on the mountain with me), I have a little more confidence and move quicker. However, I was the only one going up (I didn't encounter any other scramblers that day other than the lady), and so I was really slow and cautious. I stopped many times to double check that I was on a reasonable path. I got confused once because there seemed to be cairns going off into nowhere, but eventually I found another path.
I definitely need to get much faster, but I think that extra speed and confidence will come with experience. I was a little stressed because I was going solo and I wanted to be back at the trailhead at a reasonable time. The lady's words were somewhat stress-inducing as well. Twice, I met climbers coming down, and the first pair were really encouraging and told me I was pretty close, which gave me a bit of a boost. I didn't take any scramble pictures on the way up, but I did on the way down. Here they are:


At the very end, I was really close to turning back because I couldn't see a path - it seemed like I should have been going upwards, but it turns out there are cairns to the far right and the very end of the scramble actually involves going around the mountain, not up (see the picture above). I got to the top at 3:15pm and I was absolutely ecstatic.
I didn't take as many pictures as I should have, and I also didn't even check out the false summit, and I kind of regret it. I was quite tired, and I was ready to start the descent pretty much right away. I can't remember a time in my life where I've been more thirsty. I also needed a drink of water (hahaha JK 😉).


Above: Wolf's Ears viewed from Gimli Peak
Here's a video instead of a panorama - I feel like it captures the scene better.
I headed down at 3:40pm. Scrambling down was definitely easier than coming up. I went slow and steady, and got to my backpack by 4:30pm. I continued down, but as the map below shows, I (accidentally) took a different route on the way down. It was nice to avoid the scree on the downhill, but getting back to the main trail took longer.
You can see above that I continue down the main trail but then split off again before getting to the white star. I saw some waterfalls closer to the mountainside, and I went off to grab more water (I had brought 2.5L but ran out).

After refilling my water, I headed back to the white star and then took a shortcut to get back to the main trail. I saw some mountain goats up close at the main trail (at around 6pm). The way back was mildly painful because I was really getting tired and my knees felt like they had taken a beating. I was surprised at how tired I was given the the elevation gain and length of the hike, which were really quite reasonable.


I got back to my car at exactly 7pm (10.5hrs from the starting time!) and headed home. It took about an hour to get off the dirt road and back onto pavement. It should take longer for most people, but I was driving on the faster side to get out of the mountains because I wanted to minimize the amount of time I spent driving in the dark. What a day!
This was really a great hike and scramble. I looked up the definition of Valhalla, and Merriam-Webster gave this as one of the definitions:
a place of honor, glory, or happiness : HEAVEN
After completing this hike I can definitely see why this park is called Valhalla. The day was quite the grind, and today (the day after), I am pretty sore all over, but I have zero regrets (except maybe the shortcut attempts, lol)!

Comments
Post a Comment